AI Cyber Bootcamp
Setup and installation instructions for the AI Cyber Bootcamp.
Black Hat USA 2026 - Setup Guide
Course Slack Channel #bhusa26_aibootcamp
August 1-4
Welcome to BlackHat USA 2026!
Install Conda - Python Virtual Environment Manager
You can install either the full Anaconda application or a minimal version called Miniconda. Miniconda is a lightweight version of Anaconda that includes only the essential packages and tools. For the purpose of this course, we recommend using Miniconda.
Step 1: Download the Installer
Get the correct installer for your OS from the Official Miniconda Download Page. Make sure to choose the right architecture (e.g., Apple Silicon vs. Intel for Mac).
Step 2: Install by Operating System
Windows
- Run the downloaded .exe file.
- Follow the prompts.
- Install for “Just Me”
- Leave “Add Miniconda3 to my PATH” unchecked to prevent system conflicts.
- Check “Register Miniconda3 as my default Python.”
- Click Install.
-
To use: Open the Anaconda Prompt from your Start Menu (do not use the standard Command Prompt).
-
Be sure to accept the required agreements. Failure to do this will result in conda not running in PyCharm.
macOS
- Graphical Installer (.pkg): Double-click the file and follow the on-screen visual prompts.
- Terminal Installer (.sh): Open Terminal and run:
bash ~/Downloads/Miniconda3-latest-MacOSX-arm64.sh
(Change the filename to match your downloaded version).
Linux
- Open the Terminal and run the installer script:
bash Miniconda3-latest-Linux-x86_64.sh
- Press Enter to read the license, then type yes to agree.
Step 3: Finish and Verify (All Systems)
- During the terminal installation (macOS/Linux), type yes when asked to run conda init. This links conda to your terminal.
- Close and reopen your terminal or Anaconda Prompt.
- Test the installation by running:
conda --version
If successful, it will output the version number. macOS and Linux users will also see a (base) prefix next to their terminal prompt.
PyCharm Professional & AI Setup Guide
Important Prerequisites
⚠️ Critical Note: You must use PyCharm Professional Edition for this class. The free PyCharm Free/Community Edition will not work because it lacks the ability to run Jupyter Notebooks. If you already have PyCharm Professional installed, you can skip straight to Step 2.
Step 1: Install PyCharm Professional (30-Day Free Trial)
- Go to the official JetBrains PyCharm Download page.
- Select your operating system (Windows, macOS, or Linux) and download PyCharm Professional.
- Run the installer and follow the setup prompts.
- Launch PyCharm. When the license activation window appears, select Start Trial and log into (or create) your JetBrains Account to activate your 30-day trial.
Step 2: Enable the JetBrains AI Assistant Plugin
- Open PyCharm and open any existing project (or create a temporary new one) to get to the main interface.
- Open your IDE settings:
- Windows/Linux: Go to
File > Settings - macOS: Go to
PyCharm > Settings
- Windows/Linux: Go to
- On the left sidebar, click Plugins.
- In the search bar at the top, type AI Assistant.
- Find the JetBrains AI Assistant plugin and click Install (or Enable if it is already installed). Restart PyCharm if prompted.
Step 3: Connect Your AI Provider (Bring Your Own Key)
To use the AI plugin without a paid JetBrains AI subscription, you must link it to your own Anthropic, Gemini, or OpenAI developer account.
Agentive AI Agents
- Generate your API Key: Log into your chosen provider’s developer platform (e.g., OpenAI API Platform, Anthropic Console, or Google AI Studio) and create a new Secret API Key/Access Token. Copy it safely.
- In PyCharm, navigate to:
Settings > Tools > AI Assistant > Providers & API keys. - Locate the Third-party AI providers section and select your specific provider.
- Paste your API Key into the designated field.
- Click Test Connection to verify everything works, then click Apply and OK.
Download the Course Material
The course materials are available on GitHub: https://github.com/gtkcyber/ai_cyber_bootcamp_2026
You can either clone the repository or download it as a ZIP file.
Option 1: Clone the Repository (Recommended)
If you have Git installed, we recommend cloning the repository. This makes it easier to pull updates if any changes are made to the course materials.
- Open your terminal (or command prompt).
- Navigate to the directory where you want to store the course files.
- Run the following command:
git clone https://github.com/gtkcyber/ai_cyber_bootcamp_2026.gitOption 2: Download as a ZIP File
If you don’t have Git installed, you can download the files manually:
- Visit the GitHub repository page.
- Click the green Code button near the top right.
- Select Download ZIP.
- Once the download is complete, extract the ZIP file to a folder on your computer.
Setup the Course Environment
Follow these steps to configure your coding environment for the bootcamp.
Step 1: Open the Project in PyCharm
- Launch PyCharm Professional.
- On the Welcome screen, click Open (or go to
File > Open). - Navigate to the directory where you cloned or downloaded the course repository.
- Select the project folder and click Open.
Step 2: Create the Conda Environment
We use a configuration file called environment-1-6.yml to ensure everyone has the same versions of the necessary libraries.
- Open the Terminal at the bottom of the PyCharm window.
- Ensure you are in the project root directory (where
environment-1-6.ymlis located). - Run the following command to create the virtual environment:
conda env create -f environment-1-6.ymlNote: This process may take a few minutes as it downloads and installs all dependencies.
Step 3: Configure the Project Interpreter
Once the environment is created, you must tell PyCharm to use it for this project.
- Open your IDE settings:
- Windows/Linux:
File > Settings - macOS:
PyCharm > Settings
- Windows/Linux:
- Navigate to Python > Interpreter.
- Click the Add Interpreter button and select Add Local Interpreter….
- Select the Use existing environment radio button.
- In the Type dropdown, select Conda.
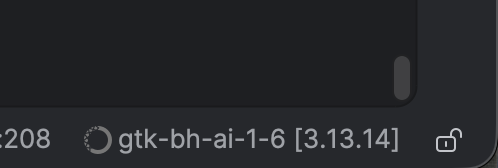
- In the Environment dropdown list, locate the environment you just created (it will be named
gtk-bh-ai-1-6). If you don’t see it, click the reload environments link. - Click OK to save the interpreter settings, then OK again to close the Settings window.
PyCharm will now begin indexing your environment, after which you will be ready to start the course!
You will see the environment selected in the lower right corner of PyCharm.
Download the Course Material
The course materials are available on GitHub: https://github.com/gtkcyber/ai_cyber_bootcamp_2026
You can either clone the repository or download it as a ZIP file.
Option 1: Clone the Repository (Recommended)
If you have Git installed, we recommend cloning the repository. This makes it easier to pull updates if any changes are made to the course materials.
- Open your terminal (or command prompt).
- Navigate to the directory where you want to store the course files.
- Run the following command:
git clone https://github.com/gtkcyber/ai_cyber_bootcamp_2026.gitOption 2: Download as a ZIP File
If you don’t have Git installed, you can download the files manually:
- Visit the GitHub repository page.
- Click the green Code button near the top right.
- Select Download ZIP.
- Once the download is complete, extract the ZIP file to a folder on your computer.
Setup the Course Environment
Follow these steps to configure your coding environment for the bootcamp.
Step 1: Open the Project in PyCharm
- Launch PyCharm Professional.
- On the Welcome screen, click Open (or go to
File > Open). - Navigate to the directory where you cloned or downloaded the course repository.
- Select the project folder and click Open.
Step 2: Create the Conda Environment
We use a configuration file called environment.yml to ensure everyone has the same versions of the necessary libraries.
- Open the Terminal at the bottom of the PyCharm window.
- Ensure you are in the project root directory (where
environment.ymlis located). - Run the following command to create the virtual environment:
conda env create -f environment-1-6.ymlNote: This process may take a few minutes as it downloads and installs all dependencies.
Step 3: Configure the Project Interpreter
Once the environment is created, you must tell PyCharm to use it for this project.
- Open your IDE settings:
- Windows/Linux:
File > Settings - macOS:
PyCharm > Settings
- Windows/Linux:
- Navigate to Project: [Project Name] > Python Interpreter.
- Click the Add Interpreter button and select Add Local Interpreter….
- In the left-hand menu, select Conda Environment.
- Select the Use existing environment radio button.
- In the dropdown list, locate the environment you just created (it should be named something like
ai-cyber). If you don’t see it, click the refresh icon. - Click OK to save the interpreter settings, then OK again to close the Settings window.
PyCharm will now begin indexing your environment, after which you will be ready to start the course!
Work with the best in AI and cybersecurity training.
Contact us to discuss custom training programs for your team.
Get in Touch